
Root and Install TWRP on Redmi Note 6 Pro

Install TWRP on Redmi Note 6 Pro: There are a lot of custom ROMs for Redmi Note 6 Pro for you to try, but to do that, you would need to flash the custom recovery on your phone. After installing a custom recovery, you can also root your device with the help of Magisk and enable Camera2API which will help you install Google Camera or GCam on your device.
Installing TWRP Custom Recovery
TWRP ( Team Win Recovery Project ) is custom recovery for Android Phone which replaces the stock recovery provided by the OEM. It provides a lot of additional functionalities over the stock recovery and hence has been loved by the users. The main reason for using a custom recovery is to be able to flash aftermarket firmware on the device. The installing procedure is pretty easy, but first, we need to go through prerequisites.
Prerequisites:
- Official TWRP File for Redmi Note 6 Pro ( codename: Tulip )
- Bootloader Unlocked Redmi Note 6 Pro
- Minimal ADB and Fastboot for Windows
- Google's Generic USB Drivers
- Magisk 18 Zip file
- Camera2API Zip File
Read More: How to Unlock the bootloader on Redmi Note 6 Pro
Steps to flashing the recovery on Redmi Note 6 Pro:
- Install Minimal ADB and Fastboot on your computer.
- Reboot your device into Fastboot mode once again by turning off and holding Volume Down + Power Button at the same time.
- Copy the TWRP IMG file which you just downloaded and Navigate to the installed directory of Minimal ADB & Fastboot and past it there.
- Hold Shift key on your keyboard and right-click to “Open Command Window here.”
- type the following into the command window
fastboot devices
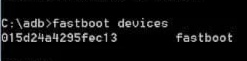
After you type in the above command, you should see something like this “0356AHX26818 fastboot or similar. Once you do then your device is correctly connected to the computer and ready to be flashed. Now input the following set of commands.
fastboot flash recovery twrp.img

fastboot boot twrp.img
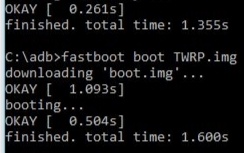
After executing the above commands one by one, you should have successfully booted into TWRP Recovery. Once you're booted, you can disconnect the device from your computer. Now that you have successfully installed TWRP recovery on your Redmi Note 6 Pro you can go ahead and flash the Magisk Zip file to gain root access.
Digital Payments in India: WhatsApp Payments – A Game Changer?
Steps to flashing Magisk Zip File:
- Now that you're booted into recovery Click “Swipe to Allow Modifications.”

- Click on Install & Navigate to the root directory of your Internal Storage and Select Magisk v18.zip
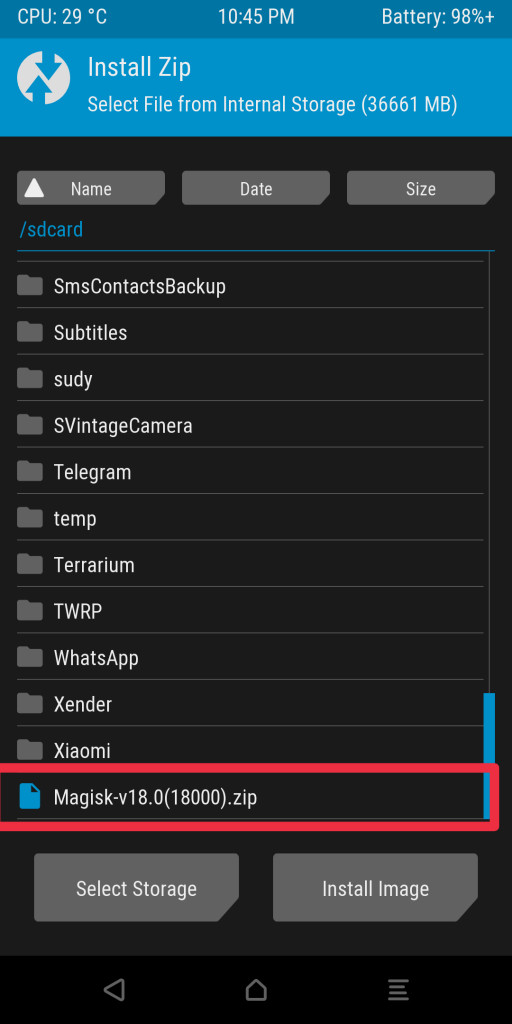
- Swipe to confirm flash and wait for it to finish.
- One flashing is completed, Wipe Dalvik & Cache, then reboot to system.
That's pretty much it. Now you have successfully rooted your Redmi Note 6 Pro using TWRP Custom Recovery. You can install the Camera2API by downloading the module from the av.


Comments